Saturday, May 19, 2018

D&D Harpies

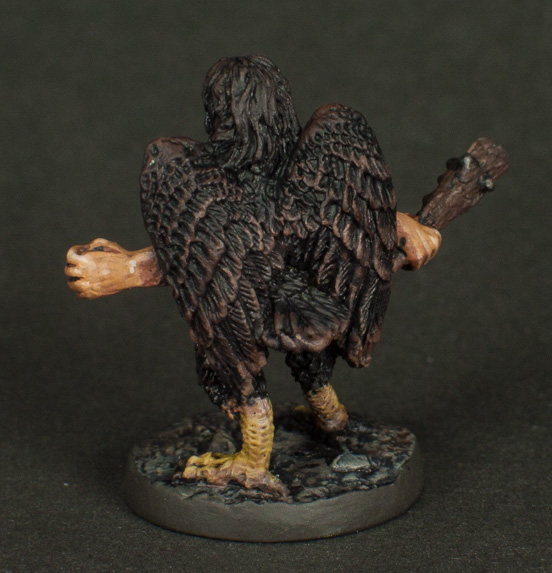
I shared the harpies and the customizations I made previously while they were WIP. Today, here they are finished.


Grenadier and Ral Partha Harpies

I admire both sets of sculpts, the Grenadier ones by Sandra Garrity and the Ral Partha ones by Bob Olley, and what's better is how well they go together, even down to the exact same style base, with similar ground details sculpted on. I'm not sure which came first, but it's as if one sculptor had copies of the others work in hand while sculpting them.

I chose a straightforward color scheme. In my D&D campaign they guard a certain mountain pass and get a lot of sun. I could have got fancier with the wing coloration but kept it dark and minimal, and used vultures as reference.


Ral Partha Harpy

Ral Partha Harpy

Grenadier Harpy

Grenadier Harpy

Ral Partha Harpy


Ral Partha Harpy


Grenadier Harpy

Grenadier Harpy

Grenadier Harpy
Grenadier Harpy

From the time I put these on my wish list it took about five years of patiently sifting eBay listings before a promising lot of either the Grenadier or Ral Partha ones showed up. If you persist as a 25mm fantasy collector for very long you'll learn patience if you didn't have it to begin with. And then, as these things sometimes go, a lot of the other ones showed up, and then several more, and I wound up with at least six of the Grenadier and a dozen or more the Ral Partha ones, as well as several of the single Alternative Armies sculpt Olley sculpted for them in the exact scale and style as the Ral Partha ones. Enough for a good sized unit in a fantasy army. These are the first, but some day years from now I may get around to doing another round or two. In the meantime, five harpies are more than a match for any adventuring party likely to grace my dungeons.

Saturday, May 12, 2018

D&D Scratch-built Ogre

I finally finished the first of an ogre encounter group I started in 2012!


Ogre

Here's how I made him (pardon the crappy picture taken from too close):

Ogre WIP

The body is from a HeroClix "Bi-Beast" figure, with the legs cut and extended either side of the knee. The arms are GW orc arms with green/brown stuff to soften the muscle definition. The orc hands were too big even for an ogre, so I switched them for goblin hands (it was the era of big hands, what can we say). The feet are press-molded from a HeroClix "White Martian" figure. The "warty bumps" are to Monster Manual spec and are just sand glued on with superglue.  I imagined them as something like human keratosis pilaris and placed them in line with this. I sculpted the head and the rest of it.

HeroClix Bi-Beast


Back when I launched my D&D project I gave ogres a lot of consideration, but I had a particular vision of them with longer legs and a smaller head than the figures I was seeing. I don't like the long-running trend of making giant humanoids (except for fire giants) more dwarf like than human figures.

My first thought was to sculpt over Marx cavemen, which I think may have been used in the original games in Lake Geneva. I settled on this bi-beast "chassis," though, which I also used for a hook horror and umber hulks (still WIP).

The base was an experiment that took too long to be practical for other figures. I did a thin layer of concrete patch (which I do a part at time and then let dry or else the plywood base would warp), then green stuff stones as thin as I could make them. Looks great but takes too long. You can see I also changed my mind after initially going with an oval base. The round one is 33mm cut to order.

I like him a lot, especially how the face turned out, but would make a few changes if I did him again. I'd make the legs even longer, give him a paunch, change the ear design a little more in line with the Monster Manual illustration, and maybe do the neck a bit differently. I had put these choices into play in further ogres I'm working on, which I'll share in a future post, though I never made the legs fully as long as I would have liked. In a world of unlimited time and projects I would have a go at sculpting a range not using parts.

Saturday, April 21, 2018

Talisman Timescape: Archeologist and Scientist

Today I have the first two Timescape figures I've painted. I have a few more in the backlog but not all, and I think I might have ebayed the Astropath I had long ago. I know I have the Cyborg and Space Pirate and one that would do well as an alt-astronaut. Might have the Space Marine and the actual Astronaut.

One thing I learned while writing this post is that these were sculpted by Trish Carden (formerly Morrison). There's an attribution on a color catalog spread. Seeing this, I went back to find attributions for the rest of the range, and I found what I think shows the first 29 figures in the range attributed to Aly Morrison. I couldn't find attribution for later figures such as the Talisman Dungeon group, but I am interested in learning. Anyone know?
Talisman Archeologist

Talisman Archeologist

Talisman Archeologist

Very pleased with how the archeologist turned out and think I drew a good bead on the colors from the illustration. I like having good reference to work from and for someone to have already thought through the colors. Sometimes I'm held up on starting a figure as I decide on colors. It also makes a game of it. How close I can hit the mark with the paints I have. I painted the hat last and with a coat of GW Charadon Granite, it struck a chord with the other three main colors and I knew I had it. Citadel Spearstaff Brown, which is a dull yellow, not brown, is another favorite color that worked great here. As a base for yellows it can't be beat and I'll be seeking this out from Coat'd'Arms when I run out, but still have some left and going strong more than 25 years after purchase!
Talisman Scientist

Talisman Scientist

Talisman Scientist


I made two small modifications to the Scientist. First, I bulked out the back of his head as it lacked bulk along that axis. Next, I made temples for the glasses made from very thin wire (very, very thin wire). Not too much else to say. I followed all the colors of the illustration per usual.

Sunday, April 8, 2018

Grenadier AD&D Gold Line WIP

A thread on the Lead Adventure Forum prompted me to gather all the Grenadier "Solid Gold" line stuff I had on the workbench, and this is what I came up with.


Fighting Men and Thieves

Fighting Men, Thieves and Hireling
Some of these are weapon-swaps and/or fixes, for example I fixed the mask the guy on the top second from the left which was skewed pretty badly in the molding process. The female thief was pretty delicate at the ankles and I have steel wires reinforcing her legs, so now she is rock solid. I resculpted the dagger over a wire so it can point out from the body in a natural way. The axe, mace, sword and shield are all from Eccentric Miniatures plastic weapon sprues. I love these and they are perfect for 25mm!
Mindflayer

Dwarves
I try to collect one and only one encounter group of each D&D "monster" type, but how would that be possible for dwarves? I don't have that kind of will power. Love these Chernak dwarves despite the ape arms, and they size well with others from Citadel and Old Glory's Ghost imprint (the Ghost one here is actually shortened by me having removed a bit of his legs and repinned him, but I did that before I mixed him in with these and you can see now he's shortest among them).
Gnomes
Somehow, over the years I've amassed this many gnomes, almost all from random assortment ebay lots. I thought about converting some, but decided life was too short, in this case. The king is the one-piece version. There's a Citadel gnome among them, too, a Perry sculpt I'm really fond of.
Goblins
Some Wizzards and Warriors line "kobolds" are mixed in. The main difference is the kobolds had tiny feet, so you can see I enlarged them (after I primed them). I love that I have mounted and foot versions of the leader-type. Most of the others are stock, except for the one axe converted to polearm, and the helmet of another axeman modified. Also, did you spot the converted Gold Line dwarf? It was a fun exercise matching the goblin faces with a sculpt of my own.
Aspis
Collecting this many aspis was also something of an endeavor that took a number of years of watching ebay. I think I even have one more somewhere. Also like with the gnomes, I wanted to do a conversion or two, but it would have been a real challenge. I did separate the antennas from the proboscis, though, and add back some details with green stuff. I left one stock, as one with this pose seems fine, but more than one seems odd.
Still to come, I've got one more group I have yet to photograph—gnolls.

Saturday, March 31, 2018

1st Mordheim Building - Laser-cut "Terror Tower" by Flying Tricycle

A table's worth of Mordheim terrain has long been one of my "some-day" projects tucked in the back of my mind. Then recently there were two unconnected events—finishing painting a long-WIP undead Mordheim gang, and wanting to have a go at a laser-cut building—that let lead me to make one of my signature project detours. I actually finished this detour, though, which is less characteristic. And in less than a month, start to finish (mid-Dec to mid-Jan), which is even less-so.

I picked the OOP "Terror Tower" kit from Flying Tricycle (which was released when Mordheim was in print, I believe) and started right in. And after quite a journey, I finished it:


It's a nice kit, even though there are aspects that are hard to explain, for example too many windows without room for shutters, and what are those balconies for. The railings, if  I was to make a railing from square dowel to go around, would also be too low, (plan to come back and do something about them if/when I think of a good solution—or can you think of one?).

There is more detail, or laser-time invested, than the average kit today, most notably the whole of the outside walls beside the visible timbers has been engraved to make the timbers raised. It's also cut from plywood, which is more expensive than the more common MDF. This is a mixed bag as it's great where the grain of the wood aligns with the grain of the engraved wood planks of pieces that represent wood, but less helpful when the grain cuts across the planks the other way, or is mean to represent daub, brick or stone.

WIP shots:


Seems like a unqualified success, right? The thing is, though, it took me 23 hours 40 minutes. 5 or 6 is closer to what I would have liked. Recording all the time you spend on your hobby has its perils, I warn you.

Part of it can be chalked up to learning something new and experimenting. I went to lengths few would think necessary, such as designing, cutting out and installing a sheet of window frames for the inside walls (no engraving on that side, I'm afraid), texturing the walls with acrylic paste (the kind made from powered marble), and texturing and rescribing all the stone and brickwork.

Love the result (do take a look at the high-res version) and I answered my question, can I make laser-cut brick look the way I think it should, but also confirmed that if there's a next time it will need to use a different method. A big part of the reason I went ahead with this is that I take a very long-term view and I want to get a sense of how much time a full-size Mordheim table would take. This experiment proves I need to go back to drawing board and come up with a faster means. I have a few other less-complex resin ruins in the works too, which so far are less demanding.

Sunday, March 25, 2018

Medieval Village Workbench WIP

Here's a medieval village I'm working on at the moment. Have had these for some years but they got to the top of the list as I need them for the D&D campaign. All are Vatican / Hudson & Allen light but sturdy foam except for an Armorcast well and unidentified resin 2-story house. Really fine sculpting and, for the most part, casting. The fortified farm does have air bubble cavities in a few places. The Hudson & Allen line are made by Vatican Enterprises. I have a large (multi-set) Hudson & Allen castle to get to some day as well. I've been tempted by the keep and the watch tower on occasion as well, though I keep telling myself not until I finish the H&A stuff I already have.

Some spray paints/primers will eat holes in the foam and partly because of this I put down a uniform black undercoat of Dupli-Color, which I know to be safe. Next a full coat of Rustoleum flat camo dark brown and then a dusting of the Rustoleum flat camo tan. At this point I can use them in a game in a pinch, and can finish them out at my leisure.


Also on the workbench is a Zvezda wooden palisade fort. The party is at such a fort at the moment, and remains to be seen if I can have it ready (enough) for the next session.

Saturday, March 10, 2018

Talisman Druid, Pilgrim and Scout

How about the Druid, Pilgrim and Scout for today's Talisman post.

Talisman Pilgrim
Talisman Pilgrim
Talisman Pilgrim
Talisman Pilgrim

In western Europe in the middle ages it was common for people of all stripes to make pilgrimages at certain points in the their lives or others, and we can imagine it to be similar in the Talisman setting. The Talisman Pilgrim, though, seems to have made it his calling, and there's a more specific term for these individuals: palmer.

I'm reading Edmund Spencer's The Fairie Queene and the palmer character therein is the perfect inspiration for roleplaying this particular figure.He follows a knight called Sir Guyon, and takes it upon himself to guide him on the path of temperance and away from such perils as a group of flirtatious nymphs seeking bathing companions.

In short, wonderful, clear inspiration to bring this miniature to life in games (as a follower, rather than PC)! I can see the GM of my Talisman-inspired games providing the same sort of incessant moral guidance, perhaps in the service of some Monty-Python-esque burlesque.

In terms of painting the painting, we are looking at a limited palette of off-white, brown, gray and flesh. The main base color is P3 Trollblood Highlight, a favorite light neutral of mine. I washed it with faint wine-brown made with P3 Sanquine Base before highlighting up to white.

I don't like how his sign turned out. It's supposed to be a piece of cloth or paper stuck to his staff and depicting a black heard. But the size of the nail leaves a cramped space for the heart beneath, which is made worse by a little notch on the bottom of the sign. In hindsight I should have sliced away the nail and puttied over the notch at the bottom, and maybe even enlarged the sign a bit, then added the nail back much smaller at the top. As it is, it looks almost as much like a fuzzily-rendered spade symbol. Maybe I'll fix it.


Talisman Druid
Talisman Druid
Talisman Druid
Talisman Druid

On to the Druid. Here's a character I've always felt a kinship with. The key to the scheme is the periwinkle  robes, and this is set off by the blue sleeves, red belt, and green mistletoe. Thankfully I have the perfect periwinkle, Vallejo Shadow Grey. This is equivalent to the old Citadel Shadow Gray now made by Coat'd'arms and called Shadow Grey there too. The highlights are warm. I can't remember exactly, but they may be flesh tones.

When it came to painting a white beard, I looked at reference pics as a I usually do and noted in photographs a white beard shows almost no definition or shadows. A white beard is generally brilliantly white. Journeyman painters will often apply the same degree of shadow, mid-tones and highlights to each thing on a figure, and in my view this is a trap that painters will have to grow out of to achieve the next rungs of our craft. Understanding the reflective properties of the different materials one is trying to depict is one of the cornerstones of mastery. To get the beard right here didn't take careful shading, it just took conviction and five extra coats of pure white.

Talisman Scout
Talisman Scout
Talisman Scout
Talisman Scout

The scout was a quick one. I think an old GW Dark Angels Green and P3 Ordic Olive were two main greens I used, among several others. Photo reference is a must for me when I paint feathers.